2016-10-30

Filipino Getting Married to a Malaysian in Malaysia: What you need to know


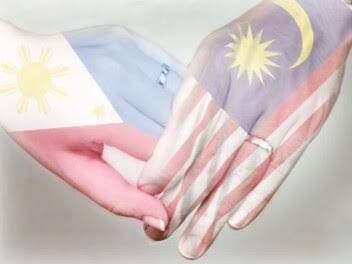
If you're a Filipino who wants to marry a Malaysian in Malaysia, then this blog post might be of help. Before we proceed, I just want to say CONGRATULATIONS! Getting married is no walk in the park especially on the legal aspects of your preparations.

When my husband and I were preparing for our marriage, we got through a lot of difficult circumstances and people. You see, some government employees are not very helpful, although most of them are (bless them), we were unlucky enough to deal with people who are either uninformed, misinformed, or people who just don't care if you waste your time or money chasing government agencies. We were exhausted  physically, mentally and financially as we were told to go to different government offices, arriving at the said place only to find out that we were supposed to do something else in another government office in another country and things like that, but I decided to be more positive 'cause I'm just absolutely ecstatic about being with the one I love and I won't let this get me down.
So to all of you who are going through the same circumstances as me, I made this blog post to help guide you on your journey. I hope this helps save you time, energy and money that you're supposed to be spending on the actual marriage ceremony. Cheers! :)

These are the documents required by JPN (Jabatan Pendaftaran Negara):

*Birth Certificate and CENOMAR both certified copy by NSO, Authenticated (Red Ribbon) by DFA and Authenticated (Stamped)Embassy of Malaysia
*Legal Capacity to Contract Marriage (obtained from Philippine Embassy in Malaysia)
*Photocopy of IC
*Photocopy of Philippine Passport
*Photocopy of Latest VISA
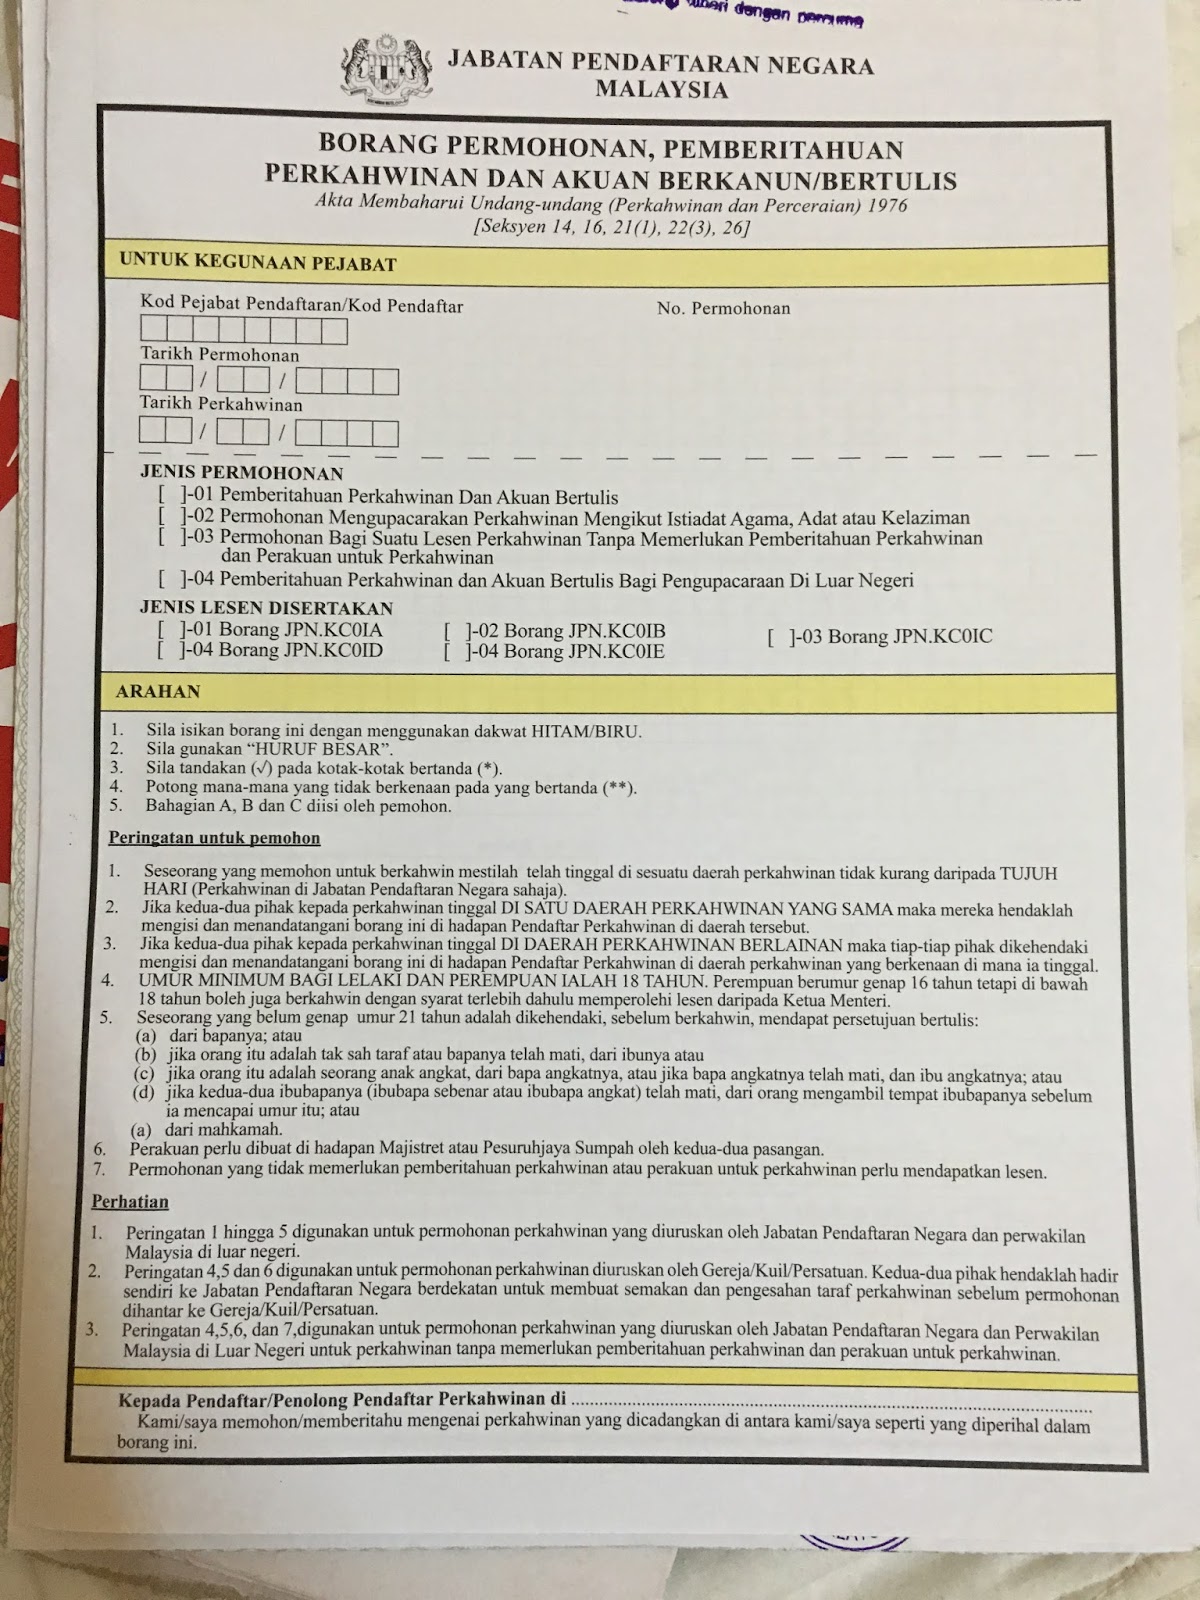
*Accomplished Application For Marriage Form ( Borang Permohonan Cardian / Cabutan Daftar Dokumen Perkahwinan)

After submitting the documents above, you will then be asked to fill out the following:
*Declaration Of Marriage Form (Borang Permohonan, Pemberitahuan, Perkahwinan Dan Akuan Berkanun / Bertulis )
*Passport sized photo of each party (To be attached on the form)

Marriage can take place after the 21 days notice.


HOW TO GET STARTED

WHILE IN THE PHILIPPINES:
You will have to obtain an NSO certified true copy of your birth certificate and CENOMAR or CErtificate of NO MARriage and there are two (2) ways to do it.

Method 1: Although it's a painstakingly long queue, you can go at the earliest available time you have (some people are already queuing as early as 5AM!) to avoid the hassle of being the 536th person to be served. The birth certificate usually cost around Php 140.00 while CENOMAR is around Php 195.00, but if you don't mind spending a bit extra to avoid the overall hassle of obtaining these documents, see method 2.

Method 2: you could visit their website ( https://nsohelpline.ph/order-now ) to have your certificate processed and delivered.  (this is not a fixer site or scam, it is completely legit!)


Here are some FAQs I got from their site:


How to request for an NSO Certificate using NSOHelpline.com?
Log on to NSOHelpline.com and click the Order Now button. You will be guided through a series of validation questions and filling up of an application form by a virtual assistant. You can also make a request by calling our hotline (02) 737-1111.

How much do I pay for the document(s)?

Birth Certificates, Marriage Certificates and Death Certificates costs Php 350.00 per copy and CENOMARs or Certificate of No Marriage costs Php 450.00 per copy. Both rates are inclusive of processing and delivery.

Where can I pay for the document(s)?

You may pay through Bancnet online, any Metrobank branch, Bancnet ATM or select Bayad Center outlets nationwide.

When can I receive the documents I requested?

Delivery is usually within 2-3 working days upon receipt of your payment.

What are the necessary requirements when receiving the documents upon delivery?

If the requester is the owner of the Birth Certificate, he'll just need to present a valid ID with picture. If the requester is not the owner, he'll have to present a valid ID with picture of him and the owner and an Authorization Letter. For Marriage Certificate, Death Certificate and CENOMAR or Certificate of No Marriage, just present a valid ID with picture of the requester.


After you received these documents, it must be authenticated(Red Ribbon) by the Department of Foreign Affairs (DFA) in DFA Authentication Division, Aseana Building, corner Bradco Ave., Macapagal Blvd. ParaƱaque City.

See map:

Here is the step-by-step guide for the Authentication:
Step 1. Fill up application form (maximum of 5 documents per application form only)
Step 2. Present a valid ID upon submission of the documents to the processing window
Step 3. Pay the Php 100.00 authentication fee (per document cost)
Step 4. Return the duplicate copy of the receipt to the processing window
Step 5. Claim the authenticated copy of the document on the release date stated upon presenting the machine-validated receipt at the releasing window

*The documents are to be processed and claimed personally.
*Authorized representatives are allowed to process these documents provided that he or she has a letter of request and special power of attorney. The authorized representative also must bring with him/her a photocopy of a valid ID of each parties bearing signatures.

After receiving your authenticated documents, you may now bring it to the Embassy of Malaysia for authentication. Each document cost about Php 300.00 per document the processing time is within three (3) working days but may take longer. The Embassy of Malaysia is located at Salcedo Mansions, Tordesillas, Makati, Metro Manila, Philippines

See map:

WHEN IN KUALA LUMPUR, MALAYSIA:

You will then bring these documents to the Embassy of the Philippines in Malaysia to apply for a Legal Capacity to Contract Marriage (LCCM). These are the things you need:

*Birth Certificate and CENOMAR both certified copy by NSO, Authendicated (Red Ribbon) by    DFA and Authenticated (Stamped)Embassy of Malaysia
*Photocopy of IC
*Photocopy of Philippine Passport
*Passport size photo of both parties (1 piece each)
*A payment of RM 106.25
*Accomplished form of affidavit of contracting parties and application for LCCM (Forms issued by Embassy of the Philippines

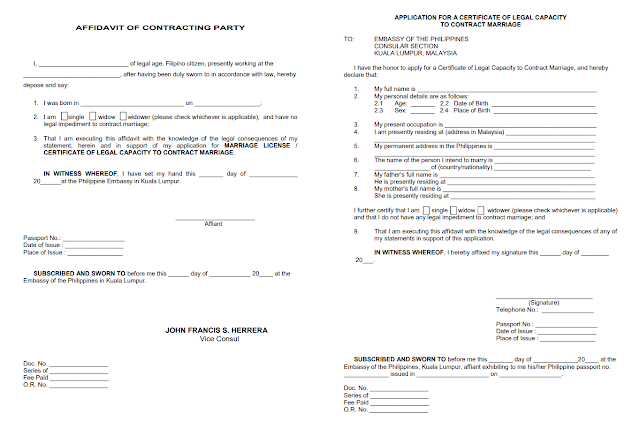
Sample forms from www.philembassykl.org.my


It will then be released after 15 working days. If you live outside Kuala Lumpur, you can have the documents delivered to you by a courier service located inside the embassy premises which will cost you around RM30 and an additional of 7 working days of waiting.


After receiving the LCCM, you should bring the documents to:
Consular Division of the Ministry of Foreign Affairs of Malaysia
(which is located in Wisma Putra, No 1, Jalan Wisma Putra, Precinct 2, 62602 PUTRAJAYA.)
for authentication and it will be released on the same day under normal circumstances (payment is RM20).

See Map


LCCM with the stamp on the bottom right of the page


All accomplished documents listed can now be submitted to JPN including an 
Accomplished Application for Marriage form Borang permohonan Cardian / Cabutan Daftar dokumen perkahwinan) issued by the said office. (as shown below)


If you do not intend to be solemnized in JPN's main office in Kuala Lumpur, (say, you want to do it in Kota Kinabalu like I did ) you will be given a sealed envelope containing an endorsement from JPN main office addressed to the branch where you intend to get married.


This is what's inside the sealed envelope :)

After assessing the documents, the JPN personnel will now hand you another form (example below) which you will partially fill up, and will be signed on the day of your solemnization.

Declaration of Marriage form ( Borang permohonan, pemberitahuan, perkahwinan dan akuan berkanun / bertulis ) will be filled out and a passport sized photo is also required for each party. A representative in JPN will explain to you everything you need to know and there will be a 21-day notice period in which you have to wait. The rule is that a notice of the civil marriage has to be filed 21 days before the date of your solemnization.


In case you can't afford to wait for the 21 days, you will then be advised to fill out another form: 
Marriage license application , without the need for notice of marriage (Permohonan lesen perkahwinan, tanpa memerlukan pemberitahuan perkahwinan dan perakuan untuk perkahwinan)


You may now decide the place for your solemnization.


Note that a payment of RM 30 will be made on that day. Participants are advised to wear formal attire and must bring two (2) witnesses.

Citizens marrying citizens can get married in Churches, Temples, Association by Assistant Registrar of Marriages, Malaysian Representative Office Abroad or in National Registration Department.
For Citizens marrying non-citizens, however, solemnization can only take place in the latter two.

Hope you have the information that you need! Good luck!

NOTE: THIS IS NOT A GOVERNMENT OWNED PAGE/POST AND STEPS/REQUIREMENTS FOR THE APPLICATION FOR MARRIAGE MAY CHANGE ANYTIME.

2016-10-26

Chocolate Crinkle Cookies

Crunchy sweet on the outside, chewy chocolatey on the inside, that's how I will describe the yummiest helpings I had of these sinful cookies. I'm sure most of you have tried it before. Many bakeries tried to sell on some of these babies and you end up disappointed as a lot of them are dry, and floury-tasting. I've tried it before and I couldn't express enough how sad those cookies are. When I finally went and worked abroad, baking became my hobby and I made it my personal quest to research and recreate the best memories I had with this cookie. The texture is similar to that of a brownie, crunchy on the outside with that chocolatey chewy and fudgy goodness on the inside. I hope you get to try these, I'm yet to perfect it, but for now, I just made the best batch I've ever tasted...! :)


Chocolate Crinkle Cookies


Ingredients:
1 cup flour
1/4 tsp salt
1 tsp baking powder
1 cup sugar
1/2 cup cocoa powder
2 eggs
1/4 cup oil
1 tsp vanilla extract
icing sugar for coating


Instructions:
1. Sift together flour, salt, baking powder and cocoa powder and set aside.
2. Combine sugar, eggs, oil and vanilla extract, then pour mixture into the dry ingredients.
3. Cover dough and chill for 1 hour (you can also make the dough the night before and chill overnight)
4. Preheat the oven to 350°F
5. Scoop the mixture, roll into balls and coat with icing sugar and place it in a baking paper lined baking sheet.
6. Bake cookies for 10-13 minutes then place in a cooling rack, ENJOY! :)

2016-10-25

Substitute Cream of Tartar

Cream of tartar. It's not really hard to find as most of grocery stores have them but if you're like me (uhmm..lazy?) you can always substitute it with something that will produce a similar effect. Although there is no perfect substitute for cream of tartar, it's always good to have a backup plan just in case, you know? :)
This substitute is applicable only for adding volume and stabilizing whipped egg whites as i haven't tried using it with some other recipes that call for cream of tartar.
Here's how:
for every 1/4 teaspoon of cream of tartar, replace it with 1 teaspoon of lemon juice or distilled white vinegar. You can double it or cut it in half, it's your call, but generally 1/8 teaspoon of cream of tartar is the amount usually needed per egg. Happy baking! :)

Substitute Buttermilk

You were in the middle of your baking and then you realized, you don't have buttermilk! well, It didnt happen to me, I usually look for subs as I'm too lazy to run to a shop just to buy stuff that I only be using half a cup of, and it will probably save you a few bucks too! here's the trick:
To make a cup of buttemilk (for baking): 
mix a Tablespoon of white vinegar to a cup of milk.
 Let it rest for about 5 minutes and boom! homemade buttermilk! Happy cooking! :)

Kelapa Pudding

Kelapa Pudding

Ube Haleya / Purple Yam Jam

With a sweet, nutty flavor, this purple yam jam / haleyang ube is perfect for fillings, spread on slices of bread, or just enjoy it as it is. It is commonly seen sold by street vendors in the Philippines after a good sunday mass and most abundant during Christmas season together with other flavorful snacks, or kakanin as we call it.
I was browsing pinterest looking for inspiration the other day and because of those drool-worthy pictures they posted, I ended up craving for those sesame seed balls or buchi as they call it in the Philippines. There's tons of different kinds of fillings and I thought, hey let's try it out with the classic haleyang ube! luckily, I made some Ginataang Halo-halo the other day and I happen to have some extra ube and glutinous rice flour tucked away so at that moment, I knew that my cravings would be satisfied! To start off, here's my recipe: :)


Ube Haleya / Purple Yam Jam


INGREDIENTS:
1 medium sized purple yam (about 1lb)
2 cups coconut milk
3/4 cup sugar
2 Tbsp butter or margarine


INSTRUCTIONS:
1. Boil the purple yam until soft and tender, drain,  then peel off skin and chop into small chunks.
2. In a pan on medium heat, melt the butter/margarine then add coconut milk, sugar and purple yam and keep stirring (and mashing and mashing chunks of yam) until mixture is dried up or desired consistency is achieved.
3. Place in any container and serve as it is or as a spread on bread, filling on buns, mochi, etc. this jam has endless possibilities! enjoy! :)

Red Bean Paste / Adzuki Paste

This Red Bean Paste or Adzuki paste is a staple in some asian cuisine as well as in japanese confectionery. It is made of adzuki beans or red beans that is boiled, mashed and sweetened. It has a  nutty and sweet flavor that complements light breads and rice flour treats. I decided to make some as I had always been a fan of munggo bread, munggo hopia and even ginisang munggo. I know they are different things as munggo is mung beans after all, but that familiar nutty taste makes me root for it as well and also one of the main reason I decided to make it is because I had had been on a glutinous rice flour treat frenzy these days and I needed something to fill my mochi. Anyway, enough with all the talking and lets make some sweet paste! :)

Red Bean Paste / Adzuki Paste


Ingredients:

1 cup red beans
5 cups water
1 cup brown sugar


Instructions:

1.In a pot over medium high heat, boil beans for 5 minutes and
   discard water, then boil again until soft and water has
   evaporated, around 45 minutes (If beans are still hard, add water to prevent it from burning)
2. Mash the cooked beans into a paste until creamy then add the sugar. (alternatively, you can also        use a blender if you want a smoother paste)
3. Cook the bean paste again with continuous stirring until sugar has melted. about 8-10
   minutes.
4. Let cool then transfer in a clean container. Enjoy it as filling
   to breads, buns and even mochi! :)

Note: Bean paste will dry out and harden as it sets so make
sure to remove from fire when you get it to a little liquidy
paste-like consistency.

Mochi

Mochi is a kind of dumpling made with mochiko flour, some kind of filling and powdered with cornstarch. As I was on research mode for this Japanese confecionary, I found out that they steam the mochiko flour first for a couple of minutes, lay it on a tray dusted with cornstarch, then shaped into a ball with the filling. It feels a bit tricky for me working with that very sticky dough so I decided to make some more research and finally found a more convenient way for me to have my beloved mochi.
It was a lazy afternoon and I was planning to make my mochi since yesterday and I already made my red bean paste. Instead of following the Japanese way of making mochi, I decided to make it in a palitaw way, or just like when I made my bilo-bilo for my ginataang halo-halo, by boiling it until it floats, that way, I would know that it is really ready. Here's how: :)


Ingredients:

1 cup glutinous rice flour
3/4 cup water (or more depending on the quality of the flour)
3/4 cup red bean paste filling
cornstarch for dusting
OPTIONAL: 1/2 cup confectioner's sugar (if you want your mochi to be a little sweeter)


Instructions:
1. Combine the glutinous rice flour and water in a bowl until a soft, dough-like consistency is achieved and form into small balls (about 15 pcs).
2. Shape the red bean paste into small balls (smaller than the glutinous rice balls)
3. Flatten the dough into a circle shape with the palm of your hands and fingers and wrap it around the red bean balls, then gently shape it into balls.
4. In a pot of boiling water, drop the mochi balls one at a time gently and boil for about 10minutes, if the mochi balls starts to float, they're cooked!
5. Drain as much water as you can from the mochi balls then roll them in cornstarch, serve! :)

Sesame Seed Balls

Silky smooth glutinous rice flour filled with nutty purple yam filling, coated with crispy sesame seeds and deep fried, this snack is packed with different textures that gives you a wonderful experience in every bite. Seriously, just by looking at those pretty pictures they posted on pinterest of these delicacies, it made me crave..a lot! And although my photo didn't do justice on these wonderful treat, I assure you the taste will convince you otherwise, so try making it, it's a wonderful new experience plus you'll have something to nibble on! :)

Sesame Seed Balls


Ingredients:
2 cups glutinous rice flour
1/2 cup sugar
1 cup water (or more depending on the quality of your flour)
1 and 1/2 cup of purple yam jam or any other filling, experiment to your liking :)
1 cup sesame seeds
oil for frying


Instructions:
1. Mix the glutinous rice flour and sugar on a bowl, make a well in the center and add water slowly and mix until the consistency is like a dough.
2. divide the dough and roll into small balls to about 15 pieces and set aside.
3. divide the filling into small balls to 15 pieces. (the filling must be smaller than the dough)
4. with your thumb and the palm of your hand, flatten the dough balls and place the filing at the center, and seal the dough. (make sure that the filling is completely sealed inside the dough)
5. Roll dough on sesame seeds and press gently to help sesame seeds settle on the dough.
6. Heat oil on a cooking pot on low heat at first, deep fry the sesame seed balls, when it floats, turn the heat to high and fry until golden brown then set aside on a paper towel to drain excess oil.
7. Enjoy! (caution: filling is extremely hot)

Pastel Buns with Yema Filling

These soft and chewy buns filled with yema filling are an absolute favorite in the Philippines. Although it's a popular pasalubong from Camiguin, It's often sold out. When I was making my cinnamon rolls the other day, biting into my rolls, the texture of the bread resembled of that in pastel and it inspired me to recreate this yummy goodness. It's not an exact recipe of that popular pastel but these lovies can surely curb your cravings for those delicacies! :)


Pastel Buns with Yema Filling


By
Soft and chewy buns filled with creamy yema filling.

Prep time: , Cook time: , Total time:
Yield: 16 mini buns

Ingredients:
2 and 3/4 cups all purpose flour
3 Tablespoons granulated sugar
1 teaspoon salt
1 package instant yeast (2 and 1/2 teaspoons)
3/4 cups fresh milk 2 Tablespoons margarine, melted
1 large egg, beaten

for the yema filling:
1 can condensed milk
3 egg yolks
1/4 cup fresh milk
2 teaspoons cornstarch diluted in 2 teaspoons of water

Instructions:
  • Combine all the ingredients for the yema filling in a saucepan and cook under medium heat until it thickens, set aside to cool.
  • Sift together flour, sugar, salt and instant yeast and set aside.
  • Mix margarine, egg and milk and pour it over the dry ingredients, and mix until a dough forms
  • Transfer the dough into a floured surface and knead for 15minutes or until the dough is tacky, smooth and no longer sticky
  • Divide dough into 16 equal pieces
  • Flatten each piece and drop a desired amount of yema filling at the center (I used a regular spoon for the filling)
  • Seal the dough into a ball (just like making dumpligs!)
  • Place the buns in a lightly greased pan and brush tops with egg whites(any pan desired would be fine, I used a rectangular pan)
  • Cover buns with a kitchen towel and let it rise for about an hour at a warm spot(at 45 minutes mark, you can preheat your oven to 350°F)
  • Bake the buns for about 30-35 minutes or until beautifully browned
  • Prepare coffee and enjoy your yummy buns! :)

  • Calories per serving: 202kcal
    Fat per serving: 5.3g

    Super Moist Banana Bread

    Okay, I gotta be honest here, I've been on a perfectly moist banana bread quest for the past 3 years. redoing it over and over again to achieve that dense and moist yet perfectly soft banana bread. I tried using and comparing both butter and margarine and I even went on great lengths of substituting butter with oil and with all the struggle, I finally came up with this fail-proof recipe. I know I will always be vigilant for a better tasting classic banana bread, and I would still be on my quest of improving this but I gotta say, this is the best and super moist banana bread I had...yet! Oh, and by the way, if for some reason you have some left overs (which I highly doubt), or maybe you wanna make it a day in advance for some potluck or something, I have good news, this loaf of goodness tastes better the next day! Goodluck and happy baking! :)


    Super Moist Banana Bread


    INGREDIENTS:

    3 over ripe bananas
    2 cups wheat flour
    1 tsp baking soda
    1 tsp baking powder
    1/4 tsp salt
    1 tsp vanilla extract
    1 cup brown sugar
    1/2 cup margarine 
    1/2 cup buttermilk
    2 eggs
    1 tsp lemon juice

    INSTRUCTIONS:
    1. Preheat oven to 325°F
    2. Mash bananas in a bowl and stir in lemon juice and set aside.
    3. Combine flour, baking soda, baking powder, salt and set aside.
    4. Using a whisk, cream margarine, sugar, and eggs, then add the buttermilk and vanilla extract.
    5. Add the flour mixture into the wet ingredients.
    6. Fold in the mashed bananas then pour batter into a baking sheet-lined loaf pan then bake for 1          hour and 15 minutes.
    7. Transfer on a cooling rack and let cool before slicing, ENJOY!

    NOTES:
    *If buttermilk is not available, this might help you out: buttermilk substitute
    *margarine can be substituted with same amount of butter.

    Cinnamon Rolls

    Freshly baked cinnamon rolls with soft, chewy buns, drizzled with milk and icing sugar glaze. So yummy and fragrant that it's gonna make your whole house filled with that delicious cinnamon aroma even while it's still baking. I remember the first time I made this was way back when I was still in Saudi Arabia, everytime we go to the mall, that stall of cinnabons would arouse our sense of smell. It was difficult for us to just head to the mall whenever we had sugar cravings so I thought maybe it's about time for me to face my fear of making yeast-containing bread. I used to think that it's really tricky with all the proofing and kneading and resting the dough. I feel like there's a 99.9% chance for me to fail at some point as I have never done it before, but hey! I was so proud of myself when i finally got to do it. I just followed the steps in making them religiously and I was satisfied with the result, although I had to adjust some ingredients according to my taste. For this particular recipe I didn't use cream cheese frosting as I don't have the ingredients readily, but this simple glaze was enough to satisfy my sweet tooth! :)


    Cinnamon Rolls


    INGREDIENTS:

    2 and 3/4 cups all purpose flour
    3/4 cups fresh milk
    1 large egg
    1 packet instant yeast (2 and 1/2 teaspoons)
    1 teaspoon salt
    3 Tablespoons granulated sugar
    2 Tablespoons margarine, melted

    Filling:

    1/4 cup margarine
    2 Tablespoons ground cinnamon
    1/4 cup brown sugar

    Glaze:

    1 cup powdered sugar
    2-3 Tablespoons fresh milk

    INSTRUCTIONS:

    1. Sift together flour, sugar, salt and instant yeast and set aside.
    2. Mix margarine, egg and milk and pour it over the dry ingredients, and mix until a dough forms
    3. Transfer the dough into a floured surface and knead for 15minutes or until the dough is tacky, smooth and no longer sticky, then transfer into a greased bowl and let rest for 5 minutes.

    4. After the dough has rested, roll it out in a 15x9 inch rectangle, spread margarine on top. Mix ground cinnamon and brown sugar together and sprinkle all over the dough.
    5. Roll the dough tightly into a log and cut into 12 pieces and place in a lightly greased 9x13 pan, cover with plastic wrap and let it rise for about 1 hour or until it doubles in size. (preheat oven to 350°F at 45 minutes mark)
    6. To make the glaze, mix the powdered sugar and milk until smooth and set aside.
    7. Remove cover and bake the rolls for about 15-20 minutes or until nicely browned and drizzle with glaze, ENJOY! :)

    Puto Cheese

    Puto cheese adapted from the classic puto, this recipe is made more convenient for those who can't get their hands on rice flour but still craving for those fluffy muffins that brings back childhood memories. All purpose flour is used on this recipe along with the addition of cheese as toppings and steamed for few minutes.
    This is very easy to make, you can never go wrong and the best part is, it takes less than 15minutes steaming time, and you're ready to munch on!


    INGREDIENTS:
    1 cup all purpose flour
    1/2 cup granulated sugar
    1 tablespoons baking powder
    1/2 teaspoon salt
    150 ml fresh milk
    1 Tablespoon melted butter
    1 egg
    cheddar cheese cut into strips

    INSTRUCTIONS:
    1. Combine flour, sugar, baking powder and salt in a bowl, set aside.
    2. Whisk egg, melted butter and fresh milk and pour it into the flour mixture.
    3. Pour batter into moulds and steam for 10 minutes.
    4. Top puto with strips of cheese and steam for another 1 minute or until cheese has melted, ENJOY! :)


    Brazo de Mercedes

    A sweet custard-filled swiss roll that is super soft and pillowy, this delightful confection is an instant hit in a Filipino gathering. Everyone would be wanting to munch on this drool-worthy treat and I admit to craving for it on some nights too. It is very popular in the Philippines that you'll find a lot of wonderful recipes for it. I tried making it in the past and I had my own adjustments on this particular recipe. It has the right amount of sweetness from the custard but it doesn't overwhelm the meringue. I'm really looking forward to making this again once I got back my baking tools (and most importantly, my mixer) that I left in the Philippines. I hope you try it and let me know what you think on the comment box below. :)


    Brazo de Mercedes

    INGREDIENTS:
    For the Meringue
    1/2 cups granulated sugar
    8 egg whites
    1 teaspoon vanilla extract
    4 teaspoons distilled white vinegar (substitute for 1 teaspoon cream of tartar)

    For the custard:
    8 egg yolks
    3/4 cup condensed milk
    1/4 tsp vanilla extract

    Confectioner's sugar / icing sugar for dusting

    INSTRUCTIONS:
    1. Preheat oven to 350°F
    2. In a bowl, add the vinegar (or cream of tartar) into the egg whites and beat with an electric mixer on high until soft peaks form
    3. Add vanilla extract and gradually add sugar while beating in high until stiff peaks form
    4. spread meringue on a baking sheet pan lined with baking paper and lightly greased and using the back of a fork, make a pattern on the meringue.
    5. Bake the meringue for approximately 20 minutes or until it's set.
    6. While the meringue is baking, make the custard filling by combining the egg yolks, condensed milk, and vanilla extract and continuously whisk in a saucepan over medium heat until it thickens and set aside.
    7. Once the meringue is done, allow to cool for a few minutes, then dust with confectioner's sugar.
    8. lay a baking sheet pan lined with a baking paper on top of meringue and quickly flip it over.
    9. Remove the baking paper, spread the custard on top and roll the meringue into a log, slice into serving pieces and serve or chill before serving. ENJOY! :)

    Ginataang Halo-Halo

    Ginataang Halo-halo is a combination of glutinous rice balls, sweet potato, purple yam, plantain and jackfruit stewed in coconut milk and sugar along with some tapioca pearls. It is sometimes called ginataang bilo-bilo or simply ginataan, in the Philippines and various other names including bubur chacha here in Malaysia. It is very filling and comforting on those rainy days but can be served chilled too. It's been raining continuously here for the past few days and it I think it would be a perfect merienda or afternoon snack. Just make sure that if you ever attempted to make some, make a lot! 'coz it's gonna disappear in an instant! :)


    Ginataang Halohalo


    INGREDIENTS:
    1 cup glutinous rice flour
    1/2 cup water(for the bilo-bilo)
    1 cup water(for the stew)
    2 cups coconut milk
    1/2 cup sugar
    1 and 1/2 cups sweet potato/ube combination
    2 cup sliced bananas
    1/2 cup sliced jackfruit
    1 cup cooked tapioca pearls

    INSTRUCTIONS
    1. To make bilo-bilo, pour water onto the glutinous rice flour and mix until it forms a dough, then shape it into small balls.
    2. In a pot, boil water, sugar and 1 cup of coconut milk and cook sweet potato/ube until tender.
    3. Add the remaining 1 cup coconut milk, bananas, jackfruit, bilo-bilo and cooked tapioca pearls and simmer until sauce thickens and bilo-bilo floats. serve hot and ENJOY :)